
Ever wondered what those colorful wires snaking around your 2010 Toyota Corolla’s stereo are for? They might seem like a tangled mess, but they actually hold the key to understanding and customizing your car’s audio system. This guide will walk you through the world of stereo wiring diagrams, revealing the secrets behind those intricate connections and empowering you to tackle your own audio modifications. Whether you’re adding a new speaker system, installing an aftermarket radio, or simply want to understand how your Corolla’s sound setup works, this comprehensive guide will be your trusted companion.

Image: repairmachinerussel.z13.web.core.windows.net
A stereo wiring diagram is essentially a map, charting the course of electrical signals from your radio to your speakers. It’s a vital tool for anyone working on their car’s audio system, as it helps identify the function of each wire and ensures correct connections. While it may look daunting at first, understanding the basics of a wiring diagram is surprisingly straightforward, and it can open up a whole new world of possibilities for enhancing your Corolla’s sound experience.
Deciphering the Language of Wires
Before diving into the specifics of your 2010 Corolla’s wiring diagram, let’s familiarize ourselves with the language. Wires are rarely labeled simply as “red” or “blue” – they often bear cryptic codes that reveal their specific function.
Color Codes and Wire Functions
- Red: Typically carries power from the battery (+12 volts) to your radio or amplifier.
- Black: Usually the ground wire, carrying the electrical signal back to the battery (0 volts).
- Yellow/Yellow with Black Stripe: Often represents the constant power source (“B+” or “ACC”), which keeps the radio’s memory and settings powered even when the ignition is off.
- Orange/Orange with Black Stripe: Commonly associated with the ignition switched power source (“Switched,” “ACC12,” or “Battery With Ignition”). This wire is only active when the ignition is turned on.
- Blue/Blue with White Stripe: Represents the remote turn-on wire (“Amplifier Turn-On” or “Remote Amp”). This wire signals an amplifier to turn on when the radio is active.
- White/White with Black Stripe: Often carries the left front speaker’s positive signal.
- Gray/Gray with Black Stripe: Often carries the left front speaker’s negative signal.
- Green/Green with Black Stripe: Often carries the right front speaker’s positive signal.
- Purple/Purple with Black Stripe: Often carries the right front speaker’s negative signal.
- Brown/Brown with Black Stripe: May carry additional speaker signal or a speaker ground wire.
Navigating Your 2010 Toyota Corolla’s Stereo Wiring Diagram
Now, let’s dive into the specific wiring diagram for your 2010 Toyota Corolla. The details of your wiring diagram may appear in your Owner’s Manual, online service manuals, or on specialized automotive websites. Don’t be intimidated by the visual clutter – the diagram is your guide to unraveling the wiring mysteries.
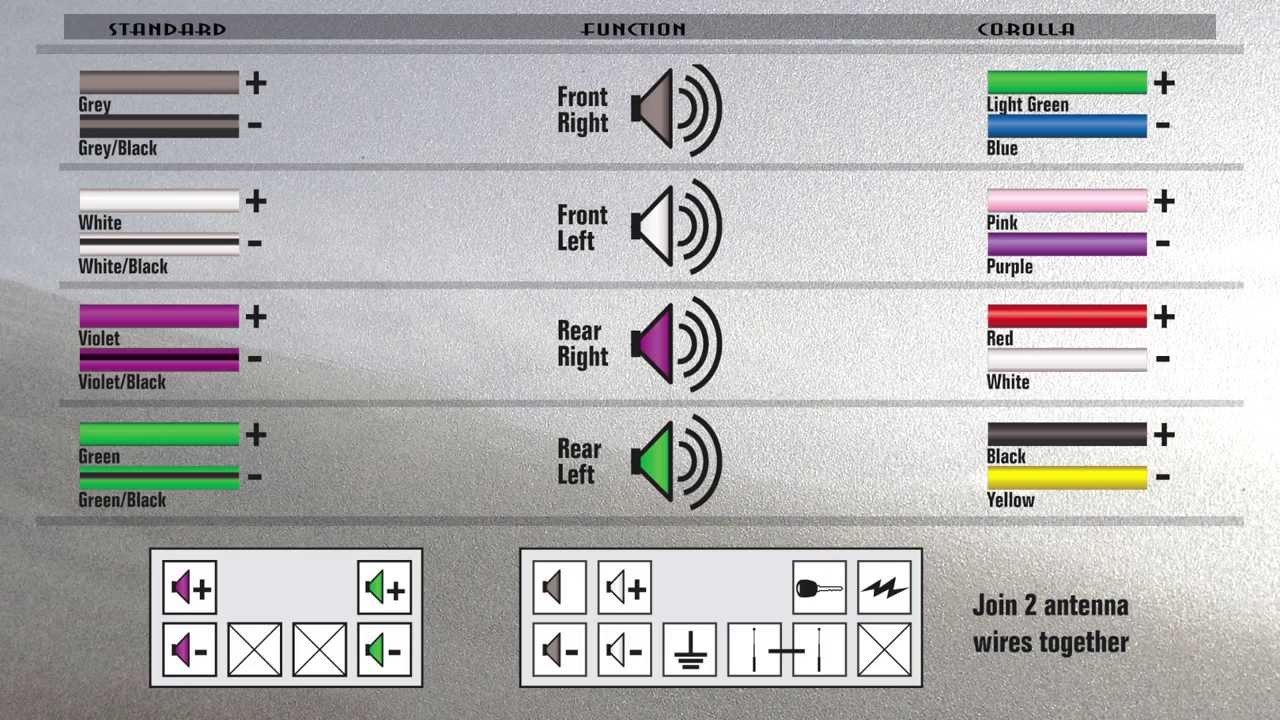
Image: garagefixtheissen88.z13.web.core.windows.net
Finding the Right Diagram
First things first, you need to make sure you’re looking at the correct wiring diagram for YOUR specific year, make, and model. A diagram for a 2008 Corolla may not be accurate for your 2010. The wiring configurations may differ slightly between model years, so ensuring you have the right diagram is crucial for a successful installation.
Understanding the Diagram’s Components
A typical stereo wiring diagram will include several key elements:
- Radio Connector: This shows the individual pins (numbered or lettered) on the back of your radio, indicating where each wire connects.
- Speaker Connector: Similarly, this section shows the pins or terminals on your speaker connectors, indicating which wires belong to which speaker.
- Power and Ground Connections: The diagram will usually show the battery’s power and ground connections, highlighting how they connect to your radio and other audio components.
- Component Labels: Look out for labels that identify the various components, like “Radio,” “Amplifier,” “Speakers,” or “Antenna.”
Pinpointing the Wires
Once you have the correct diagram, you’ll be able to pinpoint the wires for each component by following the color codes and labels. The diagram may use a color code legend or directly label the wires. For the 2010 Corolla, you can usually find the following wires:
- Radio Power: Red wire, connected to the battery’s positive terminal.
- Radio Ground: Black wire, connected to the battery’s negative terminal or a chassis ground.
- Antenna: Usually a thin wire (often black) connected to the radio’s antenna connector.
- Speaker Wires: These come in pairs, with one wire positive (+) and one wire negative (-) for each speaker. The colors might vary depending on the audio system configuration.
Practical Applications of the 2010 Toyota Corolla Stereo Wiring Diagram
Now that you understand how to interpret your 2010 Corolla’s stereo wiring diagram, let’s see how you can use this knowledge to improve your car’s audio experience.
Adding a Subwoofer
A wiring diagram is essential for connecting a subwoofer to your factory stereo system. You can find the appropriate wiring for the “speaker output” connection on your diagram, and use it to connect to the subwoofer’s input. You may also need to add a wiring harness for a subwoofer amplifier if you’re running an external amplifier.
Installing an Aftermarket Head Unit
Replacing your factory radio with an aftermarket unit requires understanding the wiring. The diagram helps you determine the right wires for power, ground, antenna, and speaker connections. Many aftermarket radios use standard wiring harnesses that make connecting these components more user-friendly.
Troubleshooting Audio Problems
If your car’s speakers are not working correctly, a wiring diagram can be a valuable troubleshooting tool. By carefully examining the diagram and inspecting the physical connections, you can often identify a wire that has become loose, broken, or incorrectly connected.
Safety First: A Note on Car Audio Modifications
While understanding your Corolla’s wiring diagram empowers you to modify your car’s audio system, safety is paramount.
- Disconnect the Battery: Before working on any electrical components, always disconnect the battery’s negative terminal to prevent accidental shocks or short circuits.
- Seek Expert Help: If you’re feeling uncertain about any aspect of the wiring process, don’t hesitate to seek advice from a qualified automotive technician. They can help you avoid potentially dangerous mistakes.
- Use the Right Tools: Employ the correct tools and materials for the job, and always double-check your work before reconnecting the battery.
2010 Toyota Corolla Stereo Wiring Diagram
Conclusion: Embracing the Journey with Your 2010 Toyota Corolla’s Stereo
Understanding your 2010 Toyota Corolla’s stereo wiring diagram is like unlocking a secret language. It’s a key that can empower you to customize your car’s audio system to your liking, from adding a powerful subwoofer to installing a new head unit. With a little patience and careful interpretation of the wiring diagram, you can create a truly personalized listening experience. So dive in, explore the connections, and discover the hidden potential within your Corolla’s sound system!


