
There’s a certain satisfaction that comes with owning a riding mower. It makes tackling a large yard a breeze, transforming a chore into a relaxing experience. But that feeling can quickly disappear when your mower starts acting up. Trying to diagnose the problem without a clear understanding of your mower’s inner workings can be like trying to fix a car without an engine diagram – confusing and frustrating. That’s where a yard machine riding mower parts diagram comes in handy.

Image: www.aiophotoz.com
Just like a car’s engine diagram, a parts diagram for your riding mower serves as a guide to its intricate components. It helps you understand the layout of the machine, identify individual parts, and even troubleshoot basic problems. Imagine the ease of being able to pinpoint the source of a rattling sound or knowing exactly where to find the air filter for a quick replacement. With a parts diagram, DIY maintenance becomes less daunting and more achievable.
Deciphering the Yard Machine Riding Mower Parts Diagram
A yard machine riding mower parts diagram is essentially a visual representation of your mower, broken down into its individual components. It typically includes a detailed illustration of the machine, with each part labeled and numbered. This makes it easy to identify specific components and understand their relationships within the overall system.
These diagrams usually provide a comprehensive view of the mower’s major systems, including:
- Engine: This section will show components such as the engine block, carburetor, spark plug, air filter, and exhaust system.
- Deck: The deck houses the blades and is responsible for cutting the grass. The diagram will show the deck’s assembly, including the blade spindles, drive belts, and cutting height adjustment mechanism.
- Transmission: This system manages power delivery to the wheels. The diagram usually portrays the transmission housing, gears, and drive shafts.
- Steering: The steering system allows you to control the mower’s direction. The diagram will illustrate the steering wheel, steering column, and linkage connected to the front wheels.
- Chassis: This is the main frame of the mower. The diagram will show the chassis structure, including the wheels, axles, and various mounting points for other components.
Navigating the Diagrams: A Step-by-Step Guide
Yard Machine riding mower parts diagrams are usually available in either a printed manual or online through the manufacturer’s website. Here’s how to navigate and utilize these diagrams effectively:
- Identify your model: Every yard machine mower has a unique model number, usually found on a sticker attached to the machine itself. Ensure you have the correct model number before accessing any online resources or referencing a printed manual, as diagrams vary across different models.
- Locate the right diagram: Once you have the correct model number, navigate to the appropriate section in the manual or website. Most manufacturers offer detailed parts diagrams organized by model.
- Use the key: The diagram will usually include a key that explains the symbols used for each part. This helps you understand the different components and their functions.
- Focus on the area of interest: If you’re looking for a specific part, use the diagram’s labeling to pinpoint the location. For example, if you need to replace the air filter, focus on the engine section of the diagram to find the correct part.
- Order parts: Once you’ve identified the required parts, most diagrams provide part numbers and links to order them directly from the manufacturer or authorized dealers.
Understanding the Benefits of Using a Parts Diagram
Using a yard machine riding mower parts diagram offers a range of advantages:
- Improved DIY Maintenance: By understanding the layout and function of each component, you can tackle basic maintenance tasks like replacing blades, air filters, spark plugs, and adjusting the cutting height without relying on professional assistance.
- Faster Troubleshooting: If your mower develops issues, the parts diagram can help you identify the potential faulty component. This saves time and allows for prompt issue resolution.
- Cost-Effective Repairs: Knowing the specific part you need eliminates the risk of buying unnecessary components or making wrong purchases. This helps you save money and minimizes potential waste.
- Enhanced Knowledge: Studying your mower’s parts diagram can provide valuable insight into its inner workings, deepening your understanding and appreciation for the machine. This knowledge empowers you to take better care of your mower and extend its lifespan.
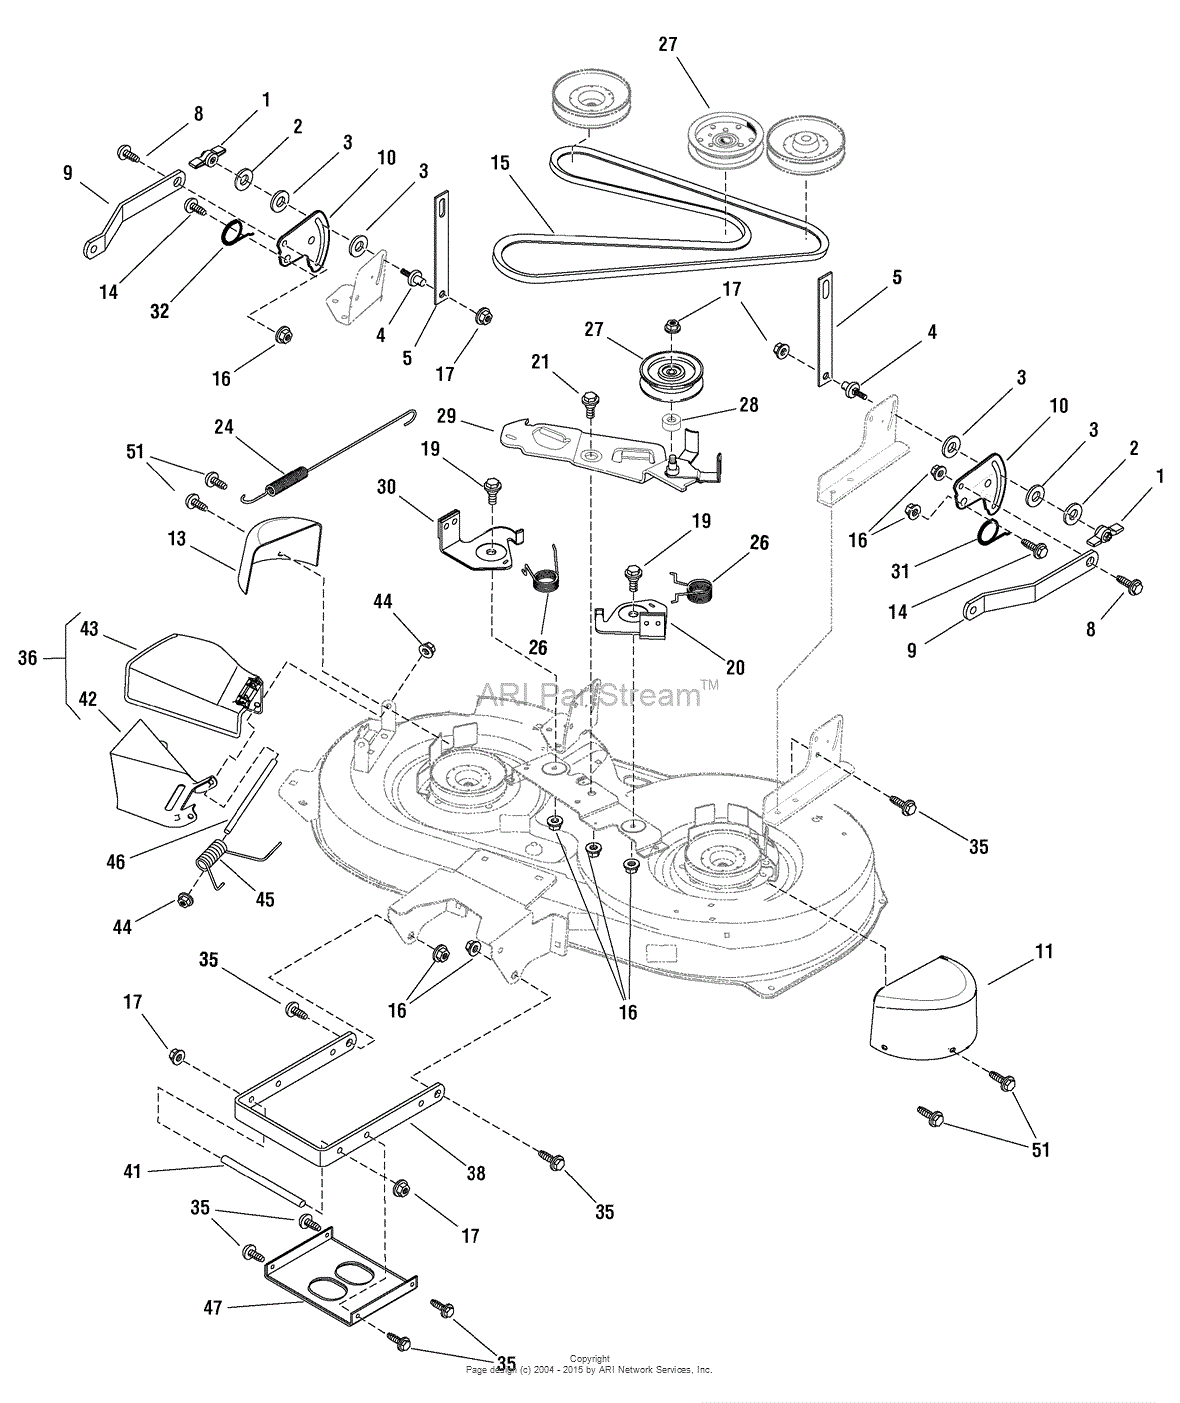
Image: galvinconanstuart.blogspot.com
Tips for Effective Use
To maximize the benefits of using a parts diagram, consider these tips:
- Keep a copy handy: Print a copy of the diagram and keep it near your mower. This provides easy access whenever you need to reference it.
- Familiarize yourself with common parts: Spend some time studying the diagram to learn the locations of essential parts like the engine, deck, transmission, and steering system. This will make future troubleshooting easier.
- Refer to the diagram before ordering parts: Double-check the part number and description on the diagram before placing an order. This ensures you’re purchasing the correct component.
- Practice safe maintenance: Always disconnect the spark plug before working on any component near the engine. Wear appropriate safety gear, and follow manufacturer instructions for all maintenance tasks.
FAQs: Answering Your Questions About Yard Machine Riding Mower Parts Diagrams
Here are some common questions about yard machine riding mower parts diagrams:
Q: Where can I find a parts diagram for my Yard Machine riding mower?
A: You can typically find parts diagrams online through the Yard Machine website or in the owner’s manual that came with your mower. You can also search for “Yard Machine riding mower parts diagram” on popular search engines to find online resources. If you have an older model, contacting a local dealer or manufacturer directly might be necessary.
Q: How are parts diagrams helpful for troubleshooting problems?
A: By identifying the components involved in a particular system, you can determine which part might be causing the problem. If your mower is making a strange noise or not starting, using the diagram can help you pinpoint the potential issue (e.g., a loose belt, a faulty spark plug, or a clogged air filter). This allows you to focus your troubleshooting efforts on the correct area.
Q: Is it possible to replace parts myself, using the diagram?
A: For many basic maintenance tasks, yes! The diagram can guide you in replacing simple components like blades, air filters, spark plugs, and adjusting the cutting height. However, for more complex repairs involving internal engine work or transmission issues, it’s best to seek professional assistance to avoid damaging your mower.
Q: Are there any other resources for finding parts diagrams?
A: Besides the manufacturer’s website, many online retailers specializing in lawn mower parts offer searchable databases with parts diagrams. You can also consult online forums, repair guides, or user communities specific to Yard Machine riding mowers for additional information and support.
Yard Machine Riding Mower Parts Diagram
Conclusion
Having a yard machine riding mower parts diagram at your disposal is invaluable for anyone seeking to maintain their mower effectively. It empowers you to perform basic repairs, troubleshoot issues, and understand the machine’s inner workings. Using this diagram can help you save money, improve your DIY maintenance skills, and extend the life of your mower.
Are you familiar with using a yard machine riding mower parts diagram? Share your experiences or any tips you’ve found useful in the comments below!


