
Have you ever found yourself staring at the intricate network of wires and fuses in your 03 Honda Civic’s fuse box, feeling a mix of curiosity and dread? Understanding this seemingly complex system is crucial for any car owner, as it holds the key to troubleshooting electrical issues and keeping your vehicle running smoothly. This guide will delve into the depths of the 03 Honda Civic fuse box diagram, unveiling its secrets and empowering you to become a more adept car owner.

Image: hondacivicjapan.blogspot.com
Imagine this: you turn the key, but your beloved Civic remains stubbornly silent. The engine refuses to roar to life, leaving you stranded and questioning the cause. The 03 Honda Civic fuse box diagram holds the answer. It serves as a roadmap to your car’s electrical system, identifying each fuse, its function, and its location. By mastering this diagram, you’ll be equipped to navigate through the maze of electrical components and diagnose potential problems with confidence.
Deep Dive into the 03 Honda Civic Fuse Box Diagram
The 03 Honda Civic fuse box, located on the driver’s side of the dashboard, houses a multitude of fuses that protect your car’s electrical circuits from overload. Think of it as a shield, safeguarding your vehicle from the potential dangers of electrical malfunctions. These fuses act like tiny soldiers, sacrificing themselves to prevent catastrophic damage to your car’s wiring.
The diagram itself is a visual representation of this intricate system, often depicted as a map with each fuse labeled and its corresponding amp rating listed. The amp rating indicates the maximum current that a particular fuse can safely handle before blowing. It’s essential to use only fuses with the correct amp rating, as using one with a higher rating can cause overheating and damage to your car’s wiring.
Fuse box location and structure:
- Driver side dashboard: The 03 Honda Civic’s fuse box is typically situated on the driver’s side of the dashboard, beneath the steering wheel.
- Fuse box cover: The fuse box is usually enclosed by a sturdy plastic cover to protect the fuses from dust and debris. To access it, you’ll need to locate this cover and carefully remove it.
- Fuse layout: The fuses are arranged in a specific order, clearly outlined in the fuse box diagram. Each fuse is usually numbered or labeled, making it easy to identify the specific fuse you’re looking for.
Types of fuses:
- Standard blade fuses: These are the most common type of fuses found in vehicles. They have a rectangular shape with a metal blade on each end.
- Mini fuses: These are smaller counterparts to standard blade fuses, sharing the same general shape.
- Low-profile fuses: Designed to be extremely compact, these fuses minimize space requirements in crowded fuse boxes.
Understanding the Fuse Diagram:
- Fuse identification: The diagram identifies each fuse with a number or a letter. This identification is matched with the individual fuse’s location within the fuse box.
- Circuit description: The diagram explains the electrical component or circuit that each fuse protects. For instance, you might see a fuse labeled “Headlights” or “Power Windows.” This information is crucial for diagnosing electrical problems.
- Amp rating: The diagram lists the amp rating for each fuse, indicating the maximum current it can handle. The amp rating is essential to ensure you replace a blown fuse with one of the correct rating.
Reading the 03 Honda Civic Fuse Box Diagram like a Pro
Armed with the knowledge of the fuse box diagram’s structure and its contents, you’re now ready to decipher its messages like a seasoned car enthusiast. The diagram is your roadmap to understanding the electrical flow and identifying potential problems.
Here’s a step-by-step approach to interpreting the fuse box diagram:
- Locate the fuse box: As mentioned earlier, the 03 Honda Civic’s primary fuse box is typically located on the driver’s side of the dashboard, underneath the steering wheel. It should be easily accessible and identifiable by its distinct cover.
- Find the fuse: Use the diagram to locate the fuse you’re looking for. This may involve matching the fuse’s number or letter with the diagram’s corresponding location within the fuse box.
- Identify the circuit: The diagram will clearly indicate the electrical component or circuit that the fuse protects. For example, you might find “Headlights” or “Power Windows” associated with the fuse you’re inspecting.
- Check the amp rating: Take note of the fuse’s amp rating, which indicates the maximum current it can handle. This number is essential when replacing a blown fuse.
- Replace if necessary: If you determine that a fuse is blown, carefully remove the old fuse and replace it with a new one of the same rating.
Troubleshooting Electrical Issues with the Fuse Box Diagram
Now that you’re familiar with the 03 Honda Civic fuse box diagram, let’s put this knowledge to practical use. The diagram becomes invaluable when troubleshooting electrical issues in your vehicle.
Common Electrical Problems:
- Headlights: If your headlights aren’t working, check the fuse labeled “Headlights” on your diagram.
- Power windows: A blown fuse associated with “Power Windows” could be the culprit behind your malfunctioning window.
- Radio or dashboard lights: A blown fuse for the radio, dashboard lights, or other electrical accessories can be a cause for concern.
Troubleshooting Steps:
- Identify the symptom: What’s the specific electrical issue you’re experiencing? A dead headlight? No power windows? A malfunctioning radio?
- Consult the diagram: Use the diagram to find the fuse responsible for the affected electrical component or circuit.
- Inspect the fuse: Carefully look for a blown fuse. The visual sign of a blown fuse is a broken or melted filament inside.
- Replace the fuse: If you find a blown fuse, replace it with a new fuse of the same amp rating.
- Test the function: Once you’ve replaced the fuse, test the relevant electrical component to confirm that the issue has been resolved.
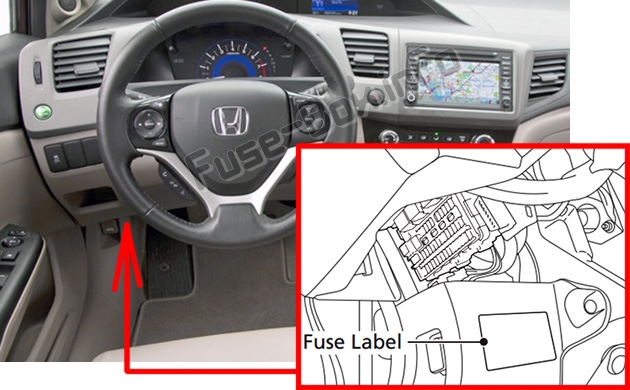
Image: userlibrarymehler.z19.web.core.windows.net
Expert Insights and Actionable Tips
Expert Tip: While troubleshooting your fuse box, remember that a blown fuse is often an indication of a deeper underlying problem. For instance, a blown headlight fuse might signal a short circuit in your headlight wiring.
Actionable Tip: If you’re unsure about diagnosing a specific electrical problem, it’s always best to consult a qualified mechanic. They have the expertise and specialized diagnostic tools to effectively identify the root cause of any electrical issues in your 03 Honda Civic.
03 Honda Civic Fuse Box Diagram
Conclusion
Understanding the 03 Honda Civic fuse box diagram is an empowering step for any car owner. It provides a visual guide to your car’s electrical system, allowing you to diagnose common electrical problems and keep your vehicle running smoothly. By mastering this diagram, you’ll be equipped to navigate through the maze of electrical components and troubleshoot with confidence. Remember, when in doubt, consulting a qualified mechanic is always a wise decision. So, unlock the secrets of your 03 Honda Civic’s electrical system and embark on a journey of self-reliance and automotive understanding!


