
I remember the first time I had to troubleshoot a faulty AC unit in my own home. It was a sweltering summer day, and the air just wouldn’t get cool. I knew I needed to check the refrigerant levels, but I didn’t know how to properly measure superheat and subcooling. Like many HVAC beginners, I was confused by these terms and their significance. Thankfully, I found a helpful guide that explained everything in a clear and concise way. In this article, I’ll share that knowledge with you, demystifying superheat and subcooling and equipping you with the skills to accurately measure them.

Image: refrigeratorsreviewed.com
Understanding superheat and subcooling is crucial for any HVAC technician. These parameters play a vital role in ensuring your AC unit operates efficiently, maximizing comfort and saving energy. By learning how to measure these values accurately, you’ll be able to diagnose problems, troubleshoot malfunctions, and maintain your system’s optimal performance. Let’s dive in and shed some light on these essential concepts.
Understanding Superheat and Subcooling
Superheat: The Heating Process
Superheat refers to the temperature difference between the refrigerant vapor leaving the evaporator and the refrigerant vapor entering the compressor. Think of it as the extra “heat” added to the already vaporized refrigerant. In simple terms, the superheat measurement indicates the degree to which the refrigerant is above its saturation point—the point where it could begin to condense back into a liquid.
Why is superheat important? It ensures the refrigerant remains in its vapor state as it flows through the compressor. A sufficient superheat prevents liquid refrigerant from entering the compressor, which could damage the unit. Essentially, it creates a buffer zone to protect the compressor from potential issues.
Subcooling: The Cooling Process
Subcooling, on the other hand, measures the temperature difference between the refrigerant liquid leaving the condenser and the refrigerant liquid entering the expansion valve. This measurement tells you how much colder the refrigerant is than its saturation point—the point where it could start to boil back into a vapor.
Just as superheat is important for the compressor, subcooling plays a vital role in the expansion valve. An adequate subcooling ensures the refrigerant completely condenses into a liquid before entering the valve, maximizing the cooling efficiency of the system. It prevents refrigerant flashes or vapor pockets from occurring within the expansion valve.
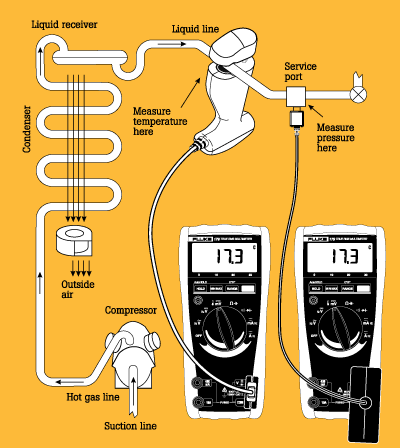
Image: rachelbrowne.z13.web.core.windows.net
How to Measure Superheat and Subcooling
Measuring superheat and subcooling requires a few essential tools: a manifold gauge set, a thermocouple, a temperature probe, and a service valve. You will be using these tools to measure the temperature and pressure at specific points in the refrigerant cycle.
Measuring Superheat
- Connect your manifold gauge set: Connect the high-pressure side of the manifold gauge set to the liquid line service valve on the condenser. Connect the low-pressure side to the suction line service valve on the evaporator.
- Open the service valves: Open the service valves on the liquid and suction lines to allow refrigerant to flow through the gauges.
- Measure the suction line temperature: Use the thermocouple or temperature probe to measure the temperature of the refrigerant vapor in the suction line at the evaporator outlet. Record the temperature.
- Measure the suction line pressure: On the low-pressure gauge on the manifold, note the pressure reading. This is the pressure of the refrigerant in the suction line.
- Determine the saturation temperature: Use a refrigerant chart or a pressure-temperature conversion calculator to find the saturation temperature of the refrigerant based on the pressure measured in Step 4. For instance, if the pressure reading is 40 psig, the saturation temperature for R-410A would be 30.5°F.
- Calculate the superheat: Subtract the saturation temperature (Step 5) from the suction line temperature (Step 3). For example, if your suction line temperature was 45°F and the saturation temperature was 30.5°F, the superheat would be 14.5°F (45°F – 30.5°F).
Measuring Subcooling
- Connect your manifold gauge set: Connect the high-pressure side of the manifold gauge set to the liquid line service valve on the condenser.
- Open the service valve: Open the service valve on the liquid line to allow refrigerant to flow through the gauge.
- Measure the liquid line temperature: Use the thermocouple or temperature probe to measure the temperature of the refrigerant liquid in the liquid line at the condenser outlet. Record the temperature.
- Measure the liquid line pressure: On the high-pressure gauge on the manifold, note the pressure reading. This is the pressure of the refrigerant in the liquid line.
- Determine the saturation temperature: Use a refrigerant chart or a pressure-temperature conversion calculator to find the saturation temperature of the refrigerant based on the pressure measured in Step 4. For instance, if the pressure reading is 250 psig, the saturation temperature for R-410A would be 89.6°F.
- Calculate the subcooling: Subtract the liquid line temperature (Step 3) from the saturation temperature (Step 5). For example, if the liquid line temperature was 80°F and the saturation temperature was 89.6°F, the subcooling would be 9.6°F (89.6°F – 80°F).
Interpreting Superheat and Subcooling Readings
The ideal superheat and subcooling values will vary depending on the specific AC unit, the refrigerant used, and the ambient conditions. A qualified HVAC technician will be able to help you determine the target values for your system. However, in general, here are some key things to remember:
- Superheat: 10-15°F is a common range for superheat in residential AC units. A low superheat (less than 10°F) could indicate a refrigerant leak, a restriction in the evaporator, or a faulty expansion valve. A high superheat (more than 15°F) could suggest a lack of refrigerant, a dirty condenser coil, or a clogged evaporator.
- Subcooling: 5-10°F is a typical range for subcooling. A low subcooling (less than 5°F) could imply a refrigerant leak, a restriction in the condenser, or a malfunctioning expansion valve. A high subcooling (more than 10°F) could point to a lack of refrigerant, a dirty condenser coil, or a restricted liquid line.
Tips for Accurate Superheat and Subcooling Measurements
The accuracy of your superheat and subcooling measurements directly impacts your diagnosis and troubleshooting. Here are some tips to ensure reliable readings:
- Use a calibrated tool set: Ensure your manifold gauge set is properly calibrated to avoid inaccurate pressure readings.
- Check the refrigerant type: Use the correct refrigerant chart or conversion calculator for the refrigerant in your system. Different refrigerants have different pressure-temperature relationships.
- Allow the system to stabilize: Run the system for a few minutes to stabilize the refrigerant flow and temperatures before taking any measurements. Ensure all components are at a constant running temperature.
- Reduce external influences: Isolate the components you are measuring from direct sunlight, wind, or other environmental factors that could affect temperature readings.
- Measure at the correct points: Make sure you are measuring temperatures and pressures at the intended points in the refrigeration cycle. Refer to the manufacturer’s specifications or consult with an experienced HVAC technician.
- Multiple readings: Take several readings at different times and locations to ensure consistent and accurate data.
FAQ
Here are some frequently asked questions about superheat and subcooling:
Q: How often should I measure superheat and subcooling?
A: It’s best to check superheat and subcooling regularly during routine maintenance or whenever you notice any performance issues with your AC unit. For optimal performance, you may want to check them every two to three months during the cooling season.
Q: Can I measure superheat and subcooling myself?
A: While it’s possible to measure superheat and subcooling yourself if you have the proper tools and knowledge, it’s typically advisable to consult with a qualified HVAC technician for accurate diagnostics and troubleshooting.
Q: What if the superheat or subcooling readings are out of range?
A: If your readings are out of range, it could indicate a refrigerant leak, a component malfunction, or other issues that require professional attention. Contact a certified HVAC technician to diagnose the problem and repair your system.
How To Measure Superheat And Subcooling
Conclusion
Understanding how to measure superheat and subcooling is a crucial skill for any HVAC professional. These simple measurements provide valuable insights into the health and efficiency of your AC system. By accurately measuring and interpreting these values, you can diagnose problems, troubleshoot malfunctions, and optimize the performance of your unit. Remember, regular maintenance and proper troubleshooting can extend the lifespan of your AC unit and keep you cool and comfortable for years to come.
Are you interested in learning more about advanced HVAC topics? Share your thoughts and questions in the comments section below!


